Textures are a wonderful way to get a touchy-feely child interested in learning. Preschoolers are especially interested in textures, so here’s a little tutorial on making a set of tactile dominoes that emphasize various textures.
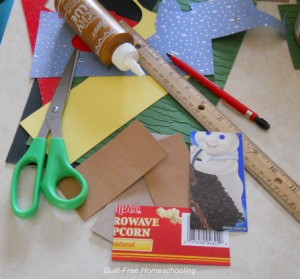
This set of dominoes used 7 different textures, mostly because that’s what I had on hand. You can make your set as large or as small as you like. I had 5 different textured papers that I’d purchased a while back from the scrapbooking section of Hobby Lobby, and I added a sheet of ordinary sandpaper (from Dollar Tree) and a sheet of craft foam to complete the set. Long-time readers will know that I love upcycling the cardboard from cereal boxes and similar packaging, and this is one more example of that. The backing of each domino is made from cereal boxes, brownie mix boxes, cracker boxes, and whatever else I had available.
Step 1: Cutting
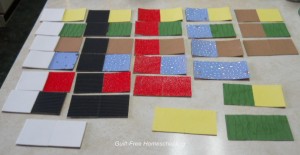
My dominoes are 2×4”, and each textured square measures 2×2”. For this complete set of 28 dominoes, I cut 28 2×4” rectangles from an assortment of cardboard boxes and 8 2×2” squares from each of the 7 textured sheets (it takes 8 because the double uses 2 of the same texture). I used a paper cutter to make quick work of the cardboard, but only because I treated myself to one a few years ago. I have made dozens of previous projects using a ruler and scissors. Remember that this project is intended as a learning toy for your kids and doesn’t have to meet the accuracy standards of NASA. Besides that, the dog might just try to eat a couple of pieces, so you don’t want to have wasted too much of your limited time on precisely measured doggie treats.
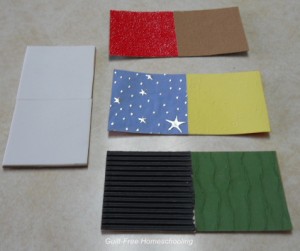
Would you like a few details on the textures I used? White is a sheet of craft foam with a smooth texture. Black is a finely corrugated paper, sort of like the inside layer of corrugated cardboard (only smaller). Green has tiny wrinkles running in rows across the paper (I glued these together so that the lines on the black squares went in the opposite direction from the wrinkle lines on the green squares). Blue has silver stars and dots that almost feel like molten metal that was poured onto the surface of the paper. Yellow has an embossed floral design. Red is a glitter paper with a very fine texture. Tan is a fine-grit sandpaper with a little more roughness than the red glitter paper. Check out the scrapbooking supply stores in your area or talk to a friend who does scrapbooking to find some great materials. The selections vary seasonally, and something I mentioned may no longer be available. Since these papers are glued onto cardboard, the durability of the paper itself isn’t important.
Step 2: Gluing
I prefer ultra-super-thick craft glue that doesn’t readily squirt or drip, and I smeared it onto the cardboard with the side of a toothpick, being careful to coat near the edges and down the middle where the paper squares would meet. Then I lined up the two texture squares, one on each end, and pressed down to be sure they were stuck without bubbles or gaps. (This is when you find out if you’ve used too much glue and get to wipe off the excess from the edges.) Repeat for each domino. It can help to stack the pieces in order before you start gluing, just so you don’t end up with any duplicated combinations.
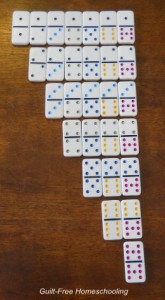
If you haven’t wasted spent countless hours of your life playing with dominoes and lining them up in patterns (as I have), this photo can help you see how to do it. I’ve used numbered dominoes (1-7) to represent the 7 textures. The top row is “texture 1” with the double-1 first, then 1-2, 1-3, 1-4, and so on to 1-7. The second row begins with the double-2 and continues through 2-7. Each subsequent row starts with its double, until row 7 contains only the double-7. Once the textured dominoes are ready for play, they can be arranged in any order. Since they don’t have numbers, any texture can be assigned the #1 position, and the remaining textures can follow in any order as positions 2 through 7. As long as the order of the first row is followed, the same type of pattern can be produced. The textures I used also just happened to be 7 different colors (making them easy to distinguish here), but a similar set could be made with 7 colors of all the same texture or 7 textures of all the same color… or any combination in any quantity that suits your children’s needs and your own creativity.
With many cereal-box projects, such as homemade flashcards, I ignore the color-printed side and write on the plain, non-printed side. For this project, I put the glue on the plain side, leaving the colored side visible on the back of each domino as sort of a bonus puzzle. The child who wants an extra challenge can sort the backsides of these dominoes by which ones came from crackers, cereal, and brownie mix boxes. Plus, I didn’t have to worry about any printing showing through a rather thin square of paper.
Step 3: Drying
As I glued the dominoes together, they began to curl — a natural effect of getting the cardboard wet, even from my not-so-runny glue. I spread the dominoes out on the table as I finished each one and held them down with cans from my pantry until they were dry. Larger cans could hold down 2 dominoes at once, which was good because my supply of heavy cans was limited!
Step 4: Playing
This set of texture dominoes is made with a double for each texture, so it will work to play a regular game of dominoes. However, I highly recommend just handing them over to the child who has been so eager to get his hands on them all the time he’s been watching or helping you make them. He probably won’t need any instructions — he will instinctively begin matching up all the pieces bearing one specific color or texture. When he’s completed that step, he will re-sort them for another color/texture. As you can see, this step could go on for quite a while, so this would be a good time for you to sneak away to shuffle the laundry or grab another cup of coffee.
This free-play session falls into what I call “stealth learning,” and your little student will be learning very important lessons. Listen closely as he tells you all the wonderful things he has learned about textures and colors and matching. He may enjoy just rubbing his fingers across the various textures over and over again, and that’s another stealth lesson. He might use each double-domino as a catalyst for finding other items in the house that are in the same color family: more stealth lessons. He might line the dominoes up end-to-end to see if they can stretch all the way across the room, or build a house shape or letter-shapes with them, or even try to build a “house of cards” with the dominoes. Even if he isn’t ready for the proper rules of the dominoes game, your child will learn plenty from color-matching, texture rubbing, and imaginative play. Playing is learning, so let learning be play.
For more ideas:
“Stealth Learning” Through Free Play

 Guilt-Free Homeschooling is the creation of Carolyn Morrison and her daughter, Jennifer Leonhard. After serious disappointments with public school, Carolyn spent the next 11 years homeschooling her two children, from elementary to high school graduation and college admission. Refusing to force new homeschooling families to re-invent the wheel, Carolyn and Jennifer now share their encouragement, support, tips, and tricks, filling their blog with "all the answers we were looking for as a new-to-homeschooling family" and making this website a valuable resource for parents, not just a daily journal. Guilt-Free Homeschooling -- Equipping Parents for Homeschooling Success!

Speak Your Mind